Women of Resilience: Tales of Kurdish Identity
CASE STUDY: BROADCAST MASTERING AND VERSIONING
Written by Sebastian Leitner - Professional Editor & Post Production Supervisor.
DISCLAIMER: This article has been provided as a courtesy and is meant exclusively for FCP Cafe
About the film
Plot:
Two former female Kurdish guerrilla fighters reconnect over their shared history and their decision to leave the movement to fight for Kurdish freedom in a different, non-violent way. A story of resistance against the suppression of one's own voice and culture.
Length:
52/55 minutes (TV/cinema)
Genre:
Documentary (Coming-Of-Age, Current Affairs)
Producer:
CrossGeneration Media, Berlin (c)2023
Director:
Andreas Rochholl
Editor:
Sebastian Leitner
Previous documentaries done in FCP by Sebastian Leitner:
- Noseland (2012)
- Cairo Jazzman (2017)
- UpBeat: Carnival of the Musicians (2018)
- The Female Voice of Iran (2020)
- The Female Voice of Afghanistan (2022)
Trailer
You can watch the trailer on YouTube here:

Overview
100% independently produced by a team of two on a very low-budget level, we had to work with a lot of limitations – but also had freedom. As a long-term fan of FCP, the only NLE where editing is really fun and creative, I spent 3 months in post production alone: Edit, grade and audio mix – all mastered twice for 1) cinema and 2) TV.
Source format:
600 GB of Sony/DJI 4K HEVC 10bit 422 (cine2/flat, rec.709) at 23,98p
Editing machine:
MBP 16” M1pro, 16GB RAM, 1TB SSD, Ventura & Sonoma
Versions needed:
- Cinema version (English subtitles) in 2K flat 1998x1080, 24p, 5.1 Surround
- TV version in HD 16:9, 25p, Stereo + M&E (ProRes HQ with 4 audio channels)
- Fully subtitled in English and German
- Clean-feed without any title inserts
Additional documents needed for broadcast:
- Music Cue Sheet for royalty regulations
- Title inserts list for localizations by TV channels
- Full script of all dialogue/narration for dubbing/captioning in the form of CC (SDH)
Additional mastering requirements:
- Frame rate conversion from finished cinema 24p version to TV 25p
- Audio normalization according to EBU R128 for broadcast
- Video normalization according to EBU R103 for broadcast
- DCP creation for cinema (DCI P3), incl. surround up-mix from 3.0 source
Due to the official release being set for early 2024, all screenshots only display collapsed clips instead of the actual thumbnails to not cause any copyright infringements at this point. It is also a lot tidier this way.
Workflow
Setup:
The SDR library is located on the internal SSD as well as all cache files, library backups, export renders and transcodes. Nothing gets stored inside the library so that it stays small and fast. For the amount of 600 GB source media, the library clocks in at under 500 MB stat way. All source media is fed from an external RAID (HDD) or portable LaCie SSD.
Organization:
As commonly done, I created events for corresponding steps in post-production. Through the use of ‘Folder Names as Keywords’ during import I could start editing right away because we took the time of naming folders when copying media to the source drive. I could easily find people, location and topics that way. My process now starts which is not using any typical media management methods besides favorite ranges or in/out points in the browser. I like to assemble groups of clips in the project with gaps in between to move parts around creatively.
Firstly, I of course finished the Director’s Cut, also known as ‘cinema version’. The original 23,98p UHD (4K 16:9) material was edited in a 2K flat 1998x1080 native 24p project (audio set to stereo). FCP working its magic already, the frame rate conform happens automatically and without hick-ups in the background. the extra resolution gave more details when scaled down and noise was reduced. I also had more room for stabilization, framing and ‘ken-burnsing’ that way.
Secondly, I knew in the end we need to conform to a 52 minutes TV version (Central-European broadcast standard length for docs) and to 25p (which happens by a 4% speed change - what has always been done since the invention of analogue TV), so I needed a 55 minutes for the cinema master in 24p (the FPS conform would take care of the length automatically due to speed up of 4%). To exactly hit 52 minutes I would just adjust the length of credits (scrolling speed) in the very end. For audio improvement I usually use Voice Isolation at 50% combined with the EQ set to ‘Tremble Boost’ – at least for our wireless Sony mics this gives crisp and clear speech.
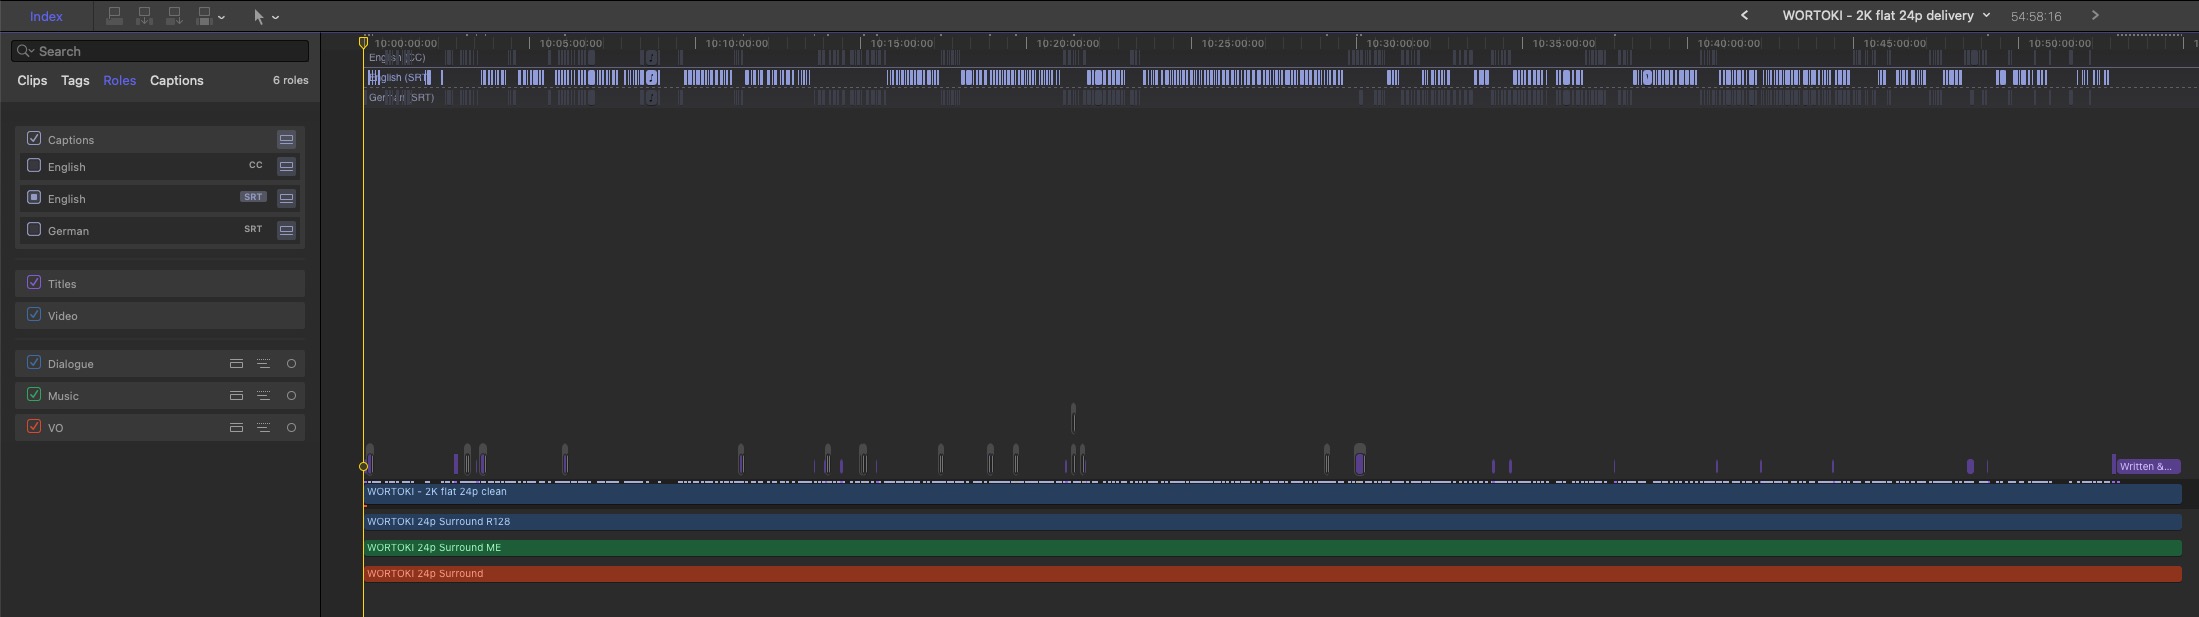
Thirdly, I made sure during editing that all roles get directly assigned to the right ones for audio and video alike, also all non-English dialogue (we had German and Kurdish besides the English narration) was translated on-the-go and out into a corresponding SRT captions track. From this point on, whatever I was doing and moving around would clearly be color-coded and ready to be filtered by the timeline index. Grading was done exclusively with the new native ‘Color Adjustment’ correction (plus some shape masks) which allow for easy highlight recovery. For sharpening I used the ‘High-pass Filter’ ported from Apple’s Motion (see bottom for details).
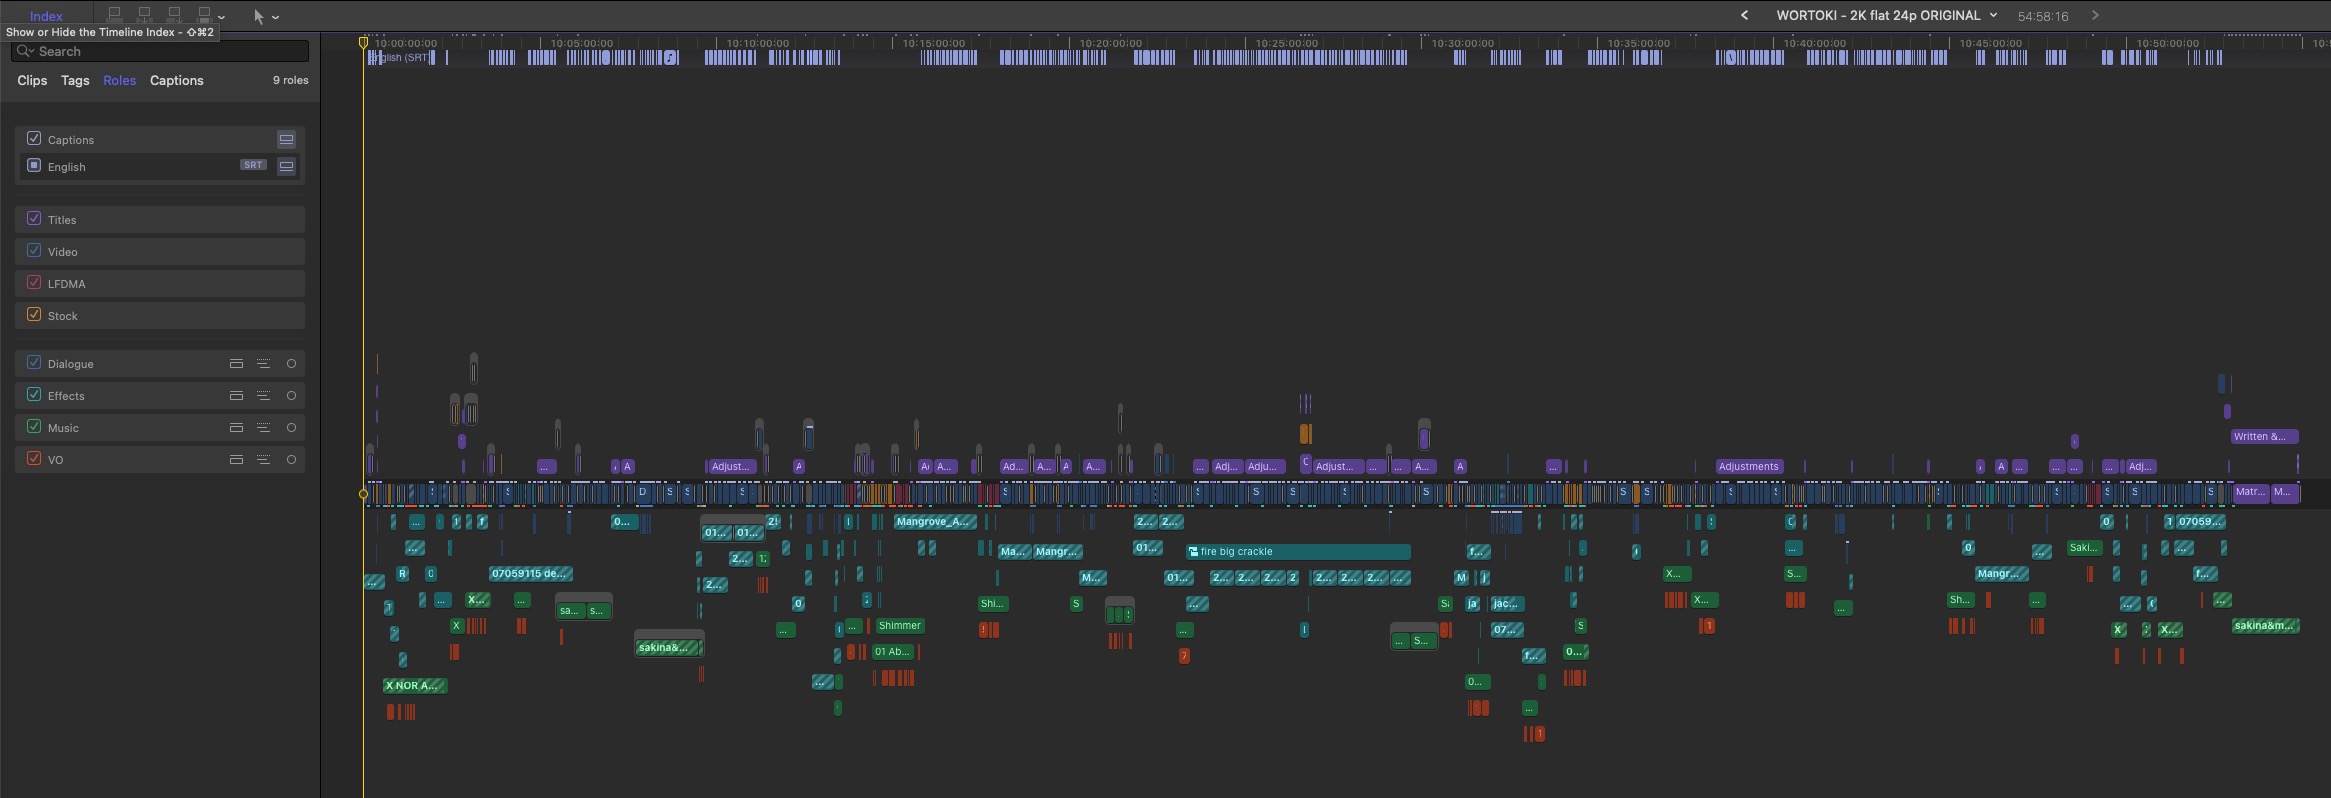
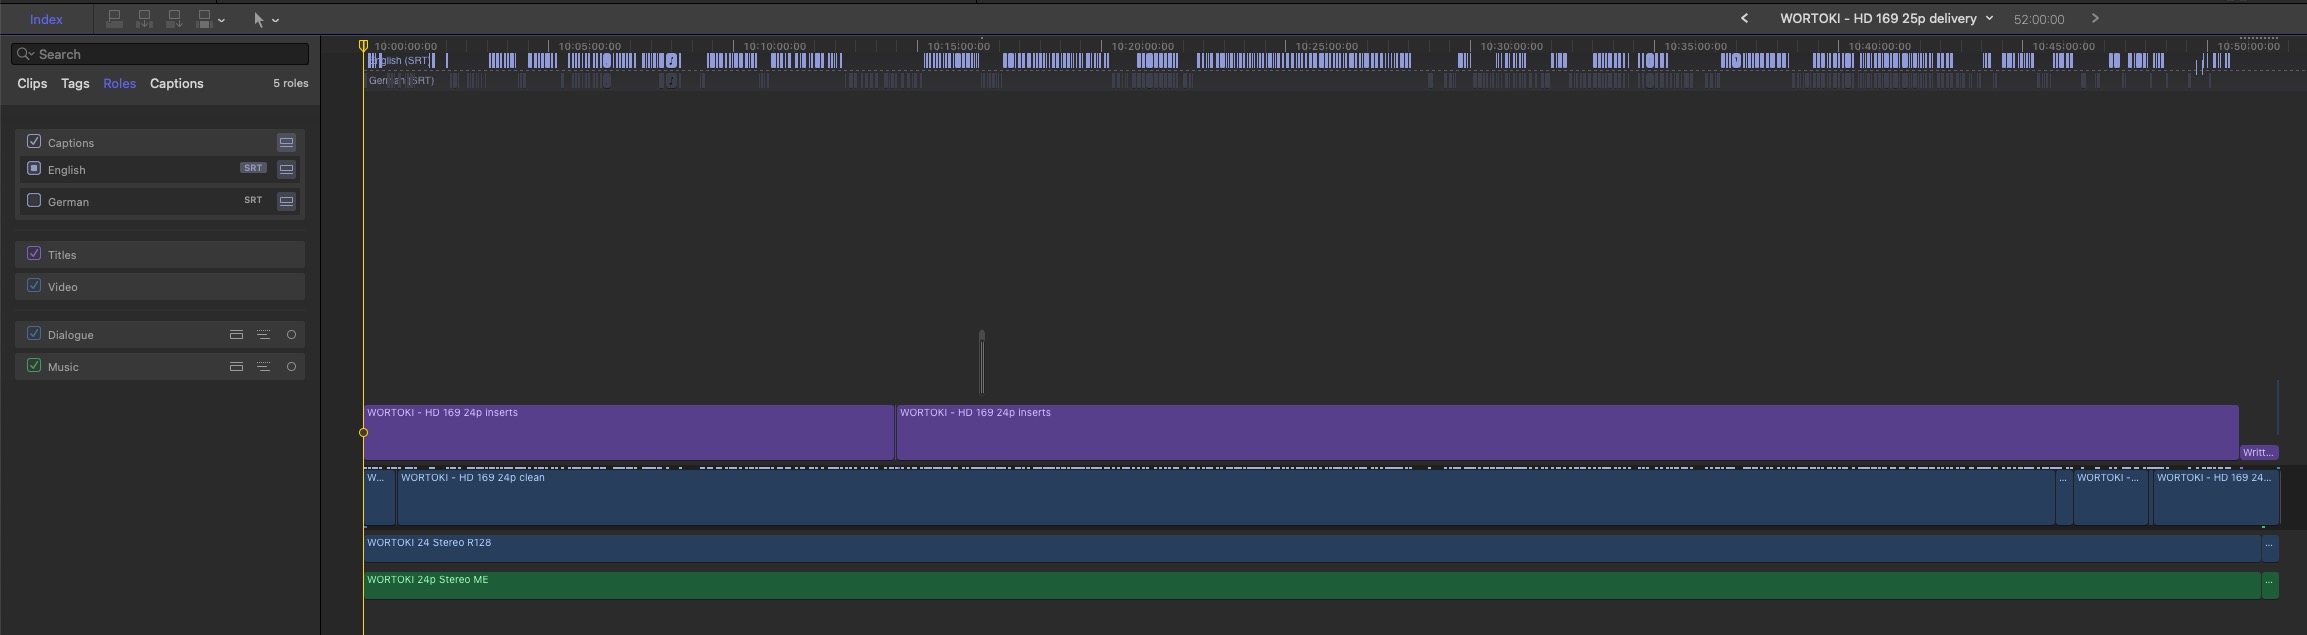
Screenshot 1A: The original 24p cinema timeline. Note the clearly assigned roles: For video there are two different types of archive material (different sources) which do not have any other purpose other than source referencing (aka ‘clippings’). The ‘Titles’ role includes all on-screen text like lower thirds, fullscreen inserts, credits or titles. For audio all elements are grouped as well with red being English narration (voice-over). The SRT track includes subtitles for all non-English dialogue.
Screenshot 1B: The original 24p cinema timeline as its own project with audio lanes enabled.
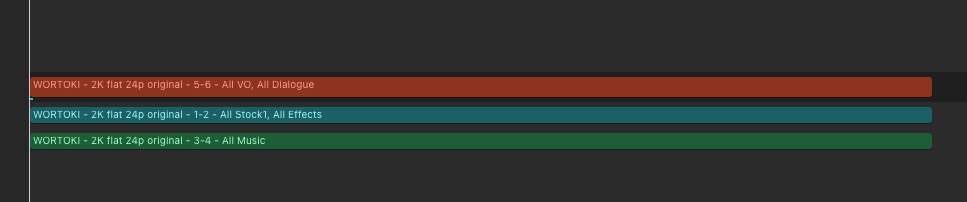
Fast forward to the interesting part of delivery preparation: The simple roles setup is enough to immediately export different assets such as clean-feed or M&E (music and effects) tracks.
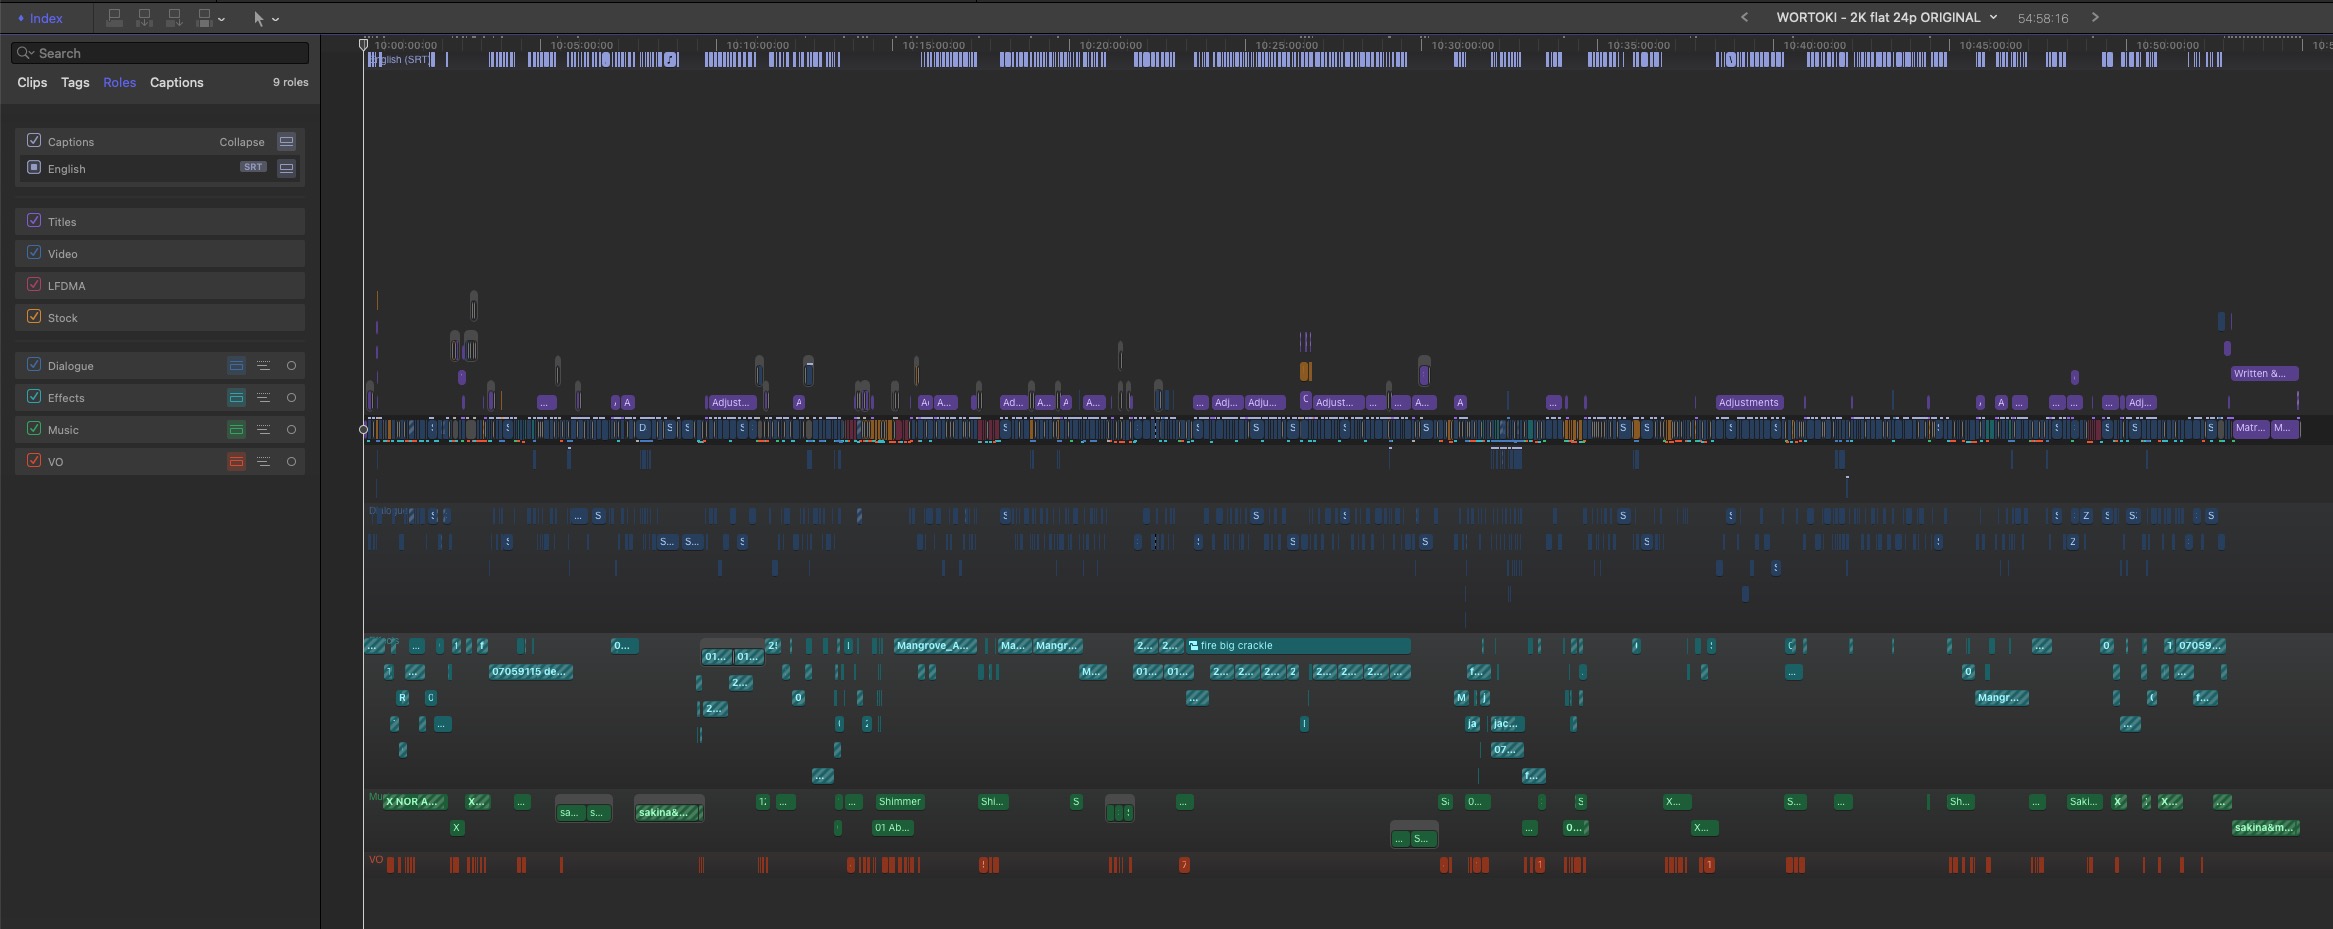
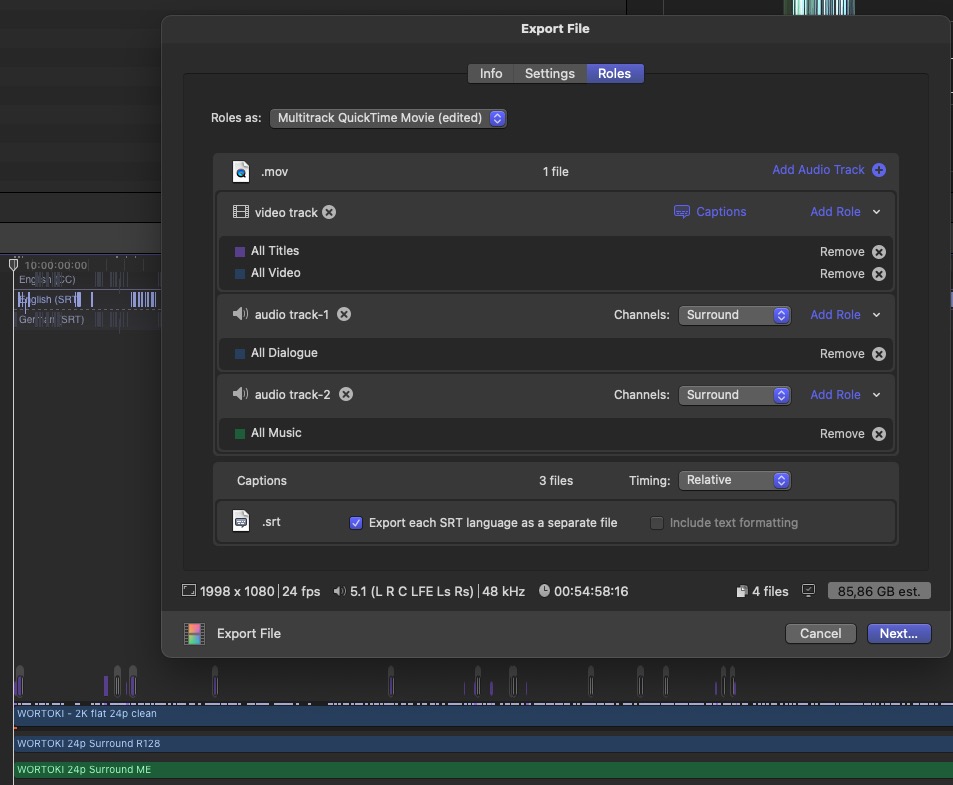
Screenshot 2: Now with roles being set, the real power of FCP’s export (share) window comes into play. Switching to ‘Separate Files’ I exported the following: A ProRes HQ clean video file, aka ‘clean-feed’, which includes everything BUT titles (important for localizations of TV channels per on territory). Note that the ‘titles’ role is missing. And the most important part is audio tracks (or ‘stems’ in this case), which are created easily that way. I will end up with 4 files, 3 of which being audio, separated into: Speech (original dialogue and extra recorded narration/voice-over), Effects (all the ambience, atmospherics or SFX I placed manually or were recorded on location) and Music. Music & Effects are stereo tracks, Speech is mono, so a total of 6 channels. It should be clear now which purpose this will server a little later on: A rough, home-made 5.1 Surround up-mix from pure stereo sources for a better cinematic experience. Last but not least: All subtitles/captions as separate SRT files per language (English and German in my case).
Screenshot 3: In a new surround (!) project I assemble the just exported stereo audio files and use FCP’s unique and genius surround panner in the inspector (set to the respective purposes) as displayed in the next screenshots. Note: I also export a special M&E stereo track now, which is a combination of all sound effects/atmospherics and music, hence the name ‘music and effects’. TV needs this for dubbing their own language version. They would re-mix audio after adding their own voice-over and synchro. Same for surround. Tedious, I know, but necessary.
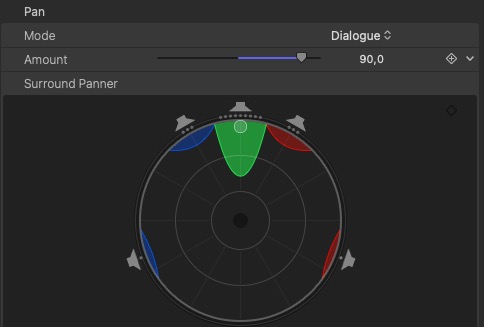
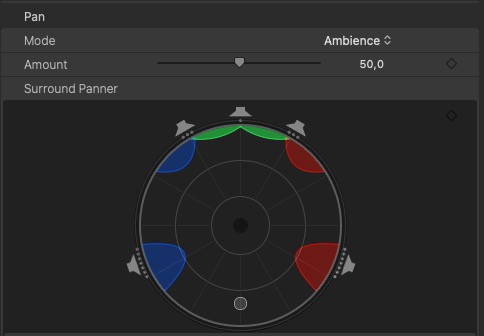
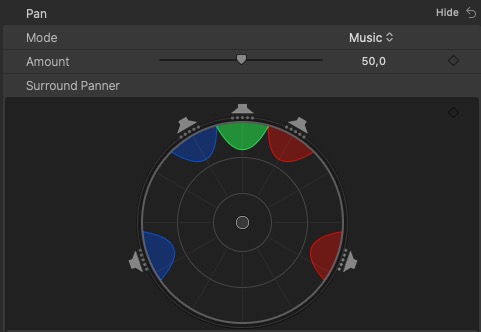
Screenshots 3A-C: The presets for Dialogue (tuned to 90), Ambience and Music delivery a solid, yet quick & dirty, way to create a 5.1 surround mix by spreading audio signals over all channels but keeping speech mainly in front (center speaker behind the cinema screen). Note: You need a separate voice/dialogue track for this, hence the before mentioned preparation. I would not recommend this (although it is possible and works OK) for just a single stereo mix – if you want to up-mix one single stereo mix, you should choose ‘create space’ as the preset instead.
As previously mentioned, for dubbing (localization) reasons, I also create a surround up-mix of just the music and effects files, meaning in short: disabling the speech track in the project. I now have all assets I need to proceed:
- Video clean-feed with titles to be added in yet another project
- Stereo mix of everything but also Stereo M&E
- Surround mix of everything, but also Surround M&E
- SRT captions for subtitles (sidecar files)
Screenshot 4: In yet another project (still 2K flat 24p but set to surround) I copy&paste all titles on top of the re-imported clean-feed, which I also added the ‘Broadcast Safe’ effect set to standard ‘0’ to. I also re-import the captions and prepared audio files. Now I have full control over ‘versioning’, which means cinema or broadcast/streaming in ‘clean’ or ‘fixed’ English.
Versioning
I can now deliver the following as listed in the very beginning:
- Cinema international version in 2K flat 1998x1080, 24p, 5.1 Surround as ProRes HQ master file with English titles and burnt-in English subtitles (captions).
The actual DCP encoding (which in itself is its own workflow and mastering step) will be done by me as well but using Davinci Resolve Studio (!) which includes Kakadu J2K cinema packaging. The world-wide digital cinema standard is still (and only) DCP IOP and requires you to jump through a few hoops to really guarantee a reliable projection quality and playability. By the way: I offer the only (free) eBook and paid video course for in-depth professional DCP mastering in Davinci Resolve Studio on my website.
- HDTV/VOD version in HD 16:9 (just change project settings for a different resolution), 24p with either Surround or Stereo + M&E as ProRes HQ, with or without titles and captions as separate files (note that there is also a CC track, meaning closed captions, aka SDH, in which also spoken English has been transcribed).
Checking the list from the beginning again, there are some special requirements for non-cinema releases. Namely R128 (audio) and R103 (video) normalizations. The latter we took care of with the ‘Broadcast Safe’ filter directly in FCP but sadly, Apple has not included audio mastering yet. Again, this task is covered by Davinci Resolve (this time ‘lite’ suffices) where you can normalize audio according to the most important standards via a right click on it in a timeline. So we have to re-import a final mix in R128 once again and put in our project. This is represented in Screenshot 4.
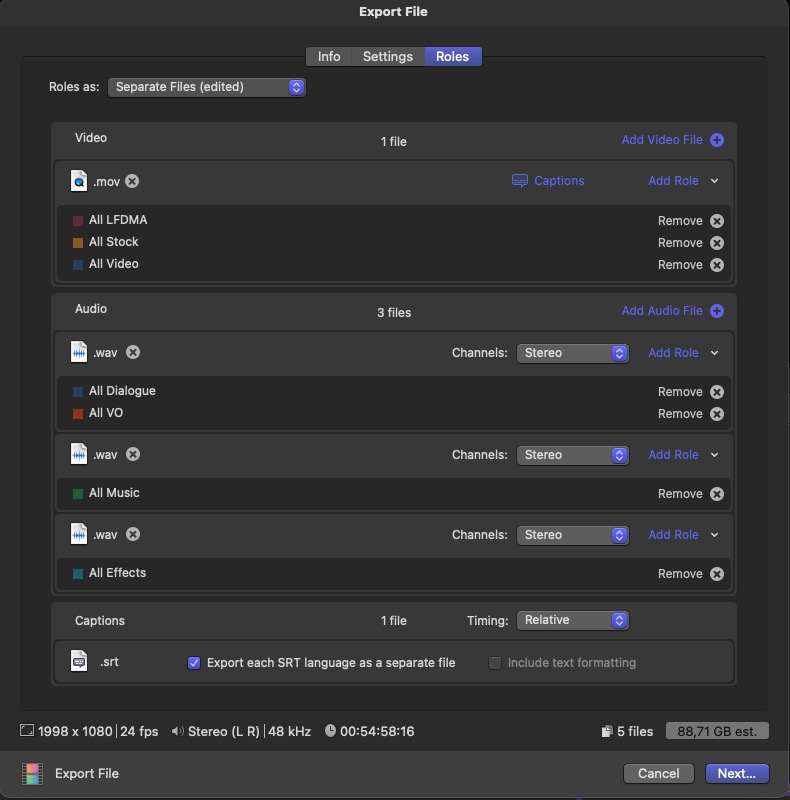
Screenshot 5A: Using the unique Multitrack option during sharing again, it is easy to deliver a ProRes master file with 12 audio tracks, where tracks 1-6 are the full surround mix in R128 for example (assigned to ‘Dialogue’ role but you could create your own) and tracks 7-12 are surround M&E, meaning everything without speech for dubbing purposes and in full scale (not R128). Also, through removing or adding the ‘Titles’ role it is easy to create a clean-feed or localized English version. Again, cations are exported separately as sidecar SRT files, as shown at the bottom.
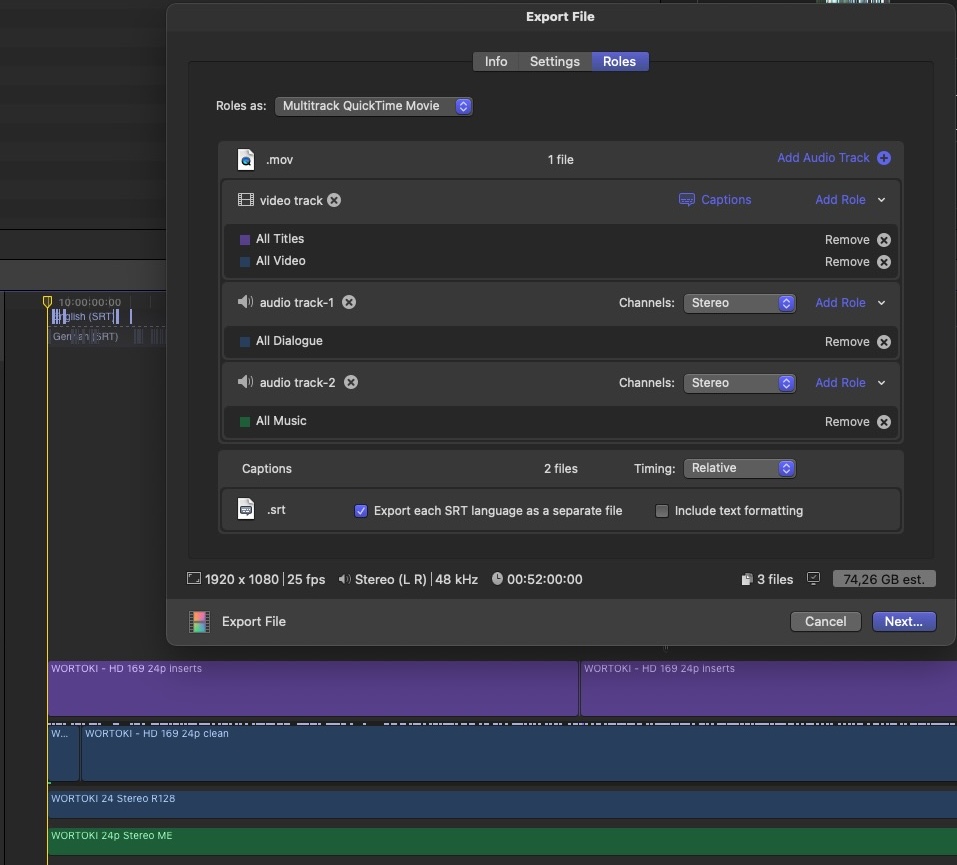
Screenshot 5B: Same thing as 5a but now it is a project set to stereo with the corresponding mixes we created before hand from the original project and/or stems.
- TV and big VOD platforms also need some documentation and special reports to go with your delivered assets. Usually a music cue sheet (MCS), a titles inserts list (TIL) and a full script of every spoken word for dubbing or localization (captioning). The latter we already have (kind of) with the above mentioned CC (SDH) SRT file – which I created by running a separated narration VO file (exported this one role) through the genius ‘MacWhisper’ app and combined the resulting SRT with the other one within the FCP captions. For the other two report docs we need all the timings (timecode) of both, text inserts and music cues.
This is where our beloved CommandPost comes to help. It can save the contents of the Timeline Index, which you should learn to love. It is your best friend, as is CommandPost: In the Timeline Index, select ‘Clips’ at the top and ‘Audio’ at the bottom to get a list of just the audio files at their corresponding position (and with their corresponding role), as demonstrated in Screenshot 6a. Of course, we are only interested in the role ‘Music’.
Now use Save Timeline Index to CSV to receive a CSV file which you can use to create a MCS (music cue sheet) for royalty reports.
Note: You can either import CSV data into an Excel table (Google knows how to do it) or get the free ‘Table Tool’ on the Appstore to open CSV files easily.
The same you can do for titles to receive a CSV for the titles inserts list as demonstrated in Screenshot 6b. It really helps, however a possible improvement would be to have the CSV also include the duration of the clips, not only their starting position.
UPDATE (1st Dec 2023): You could also create a Smart Collection of Used Media, and export a CSV from the Browser using CommandPosts's Save Browser Contents to CSV.
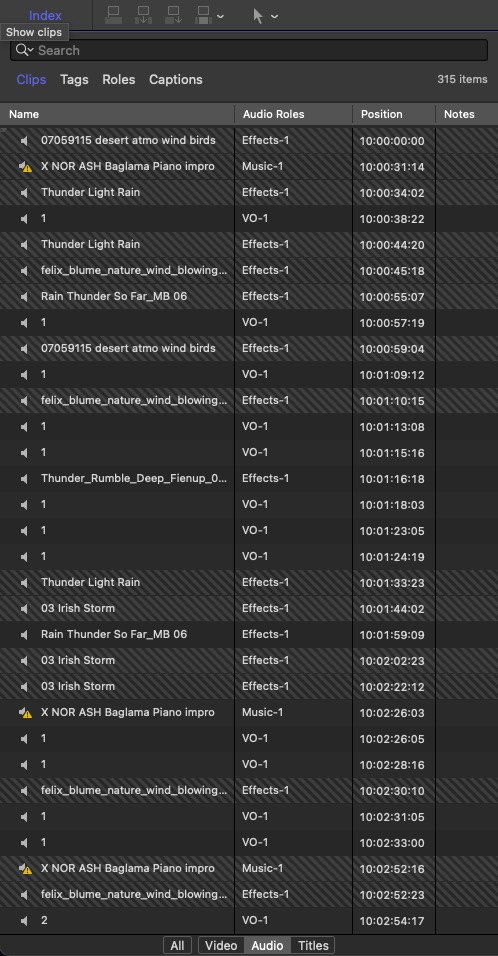
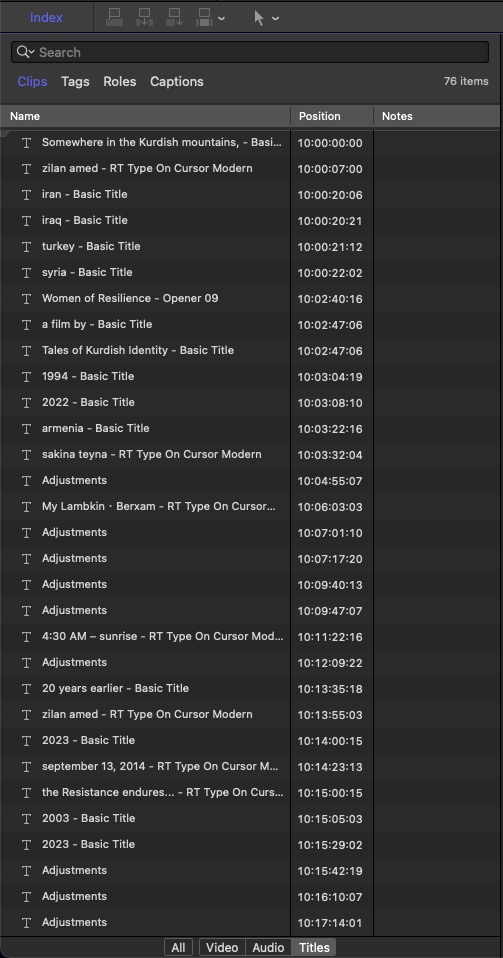
Screenshots 6A-B: Using the Timeline Index to get a list of music and titles cues as CSV via CommandPost. As you can see, the duration is missing, which would be helpful if requested.
UPDATE (1st Dec 2023): Seems like there is an easier and a lot more straightforward solution for cue sheets (music and titles) by using the fantastic companion app Producer’s Best Friend by Intelligent Assistance. Hurray!
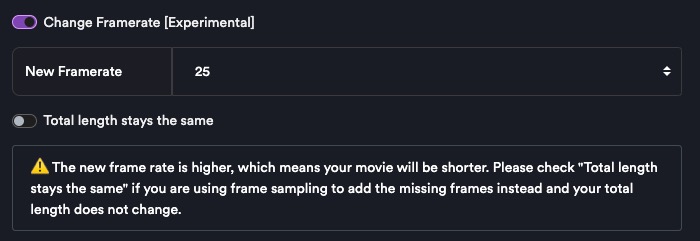
Now comes the last, most tedious, step, which you might not need: The frame rate conversion to 25p for ex-PAL TV stations (in HD 16:9 and Stereo R128). Yet another project created, making sure it is set to 25p. Dropping in the clean-feed in 24p and FCP works its magic. It has already been conformed and speed-changed by 4% and is reduced in length because of it. I exported the Titles role as a separate video (from the 24p project) before in ProRes 4444, which includes an Alpha channel, meaning: Transparency. Why? Because now also the titles get speed-changed and are in sync without me adjusting every single title manually. I can still export another clean-feed, this time in 25p, this way. This is represented by the purple role in Screenshot 7.
For audio, I drop in the previously exported Stereo mixes (R128 and M&E) and manually speed-change them (FCP does not do this automatically for audio, which is a good thing!) by 4,1% (remember, the original FPS was 23,98 not native 24p, hence 0,1% more – yes, I know everything is super confusing). Audio should not be in complete sync and at the exact same length as video.
Remember the captions? The only thing not speed-changeable (why not, I ask, would be a neat feature) are the subtitles, so before we can import them here, we need them to be conformed to 25p too. Luckily there is a great free online tool for this purpose as shown in Screenshots 8a-b: https://editingtools.io/subtitles/ (expand the ‘advanced’ options).
Screenshot 7: The clean-feed 24p assets (audio and video) in yet a new project, which is set to HD 25p for broadcast PAL conforming. Note: This requires a speed change of 4,1% and will make the film shorter (or longer if you go the other way). FCP takes care of most of the process automatically. If you have separate sound (and did not include it in the clean video), you need to change its speed manually: Right click, change duration, use 104,1% for 24p -> 25p.
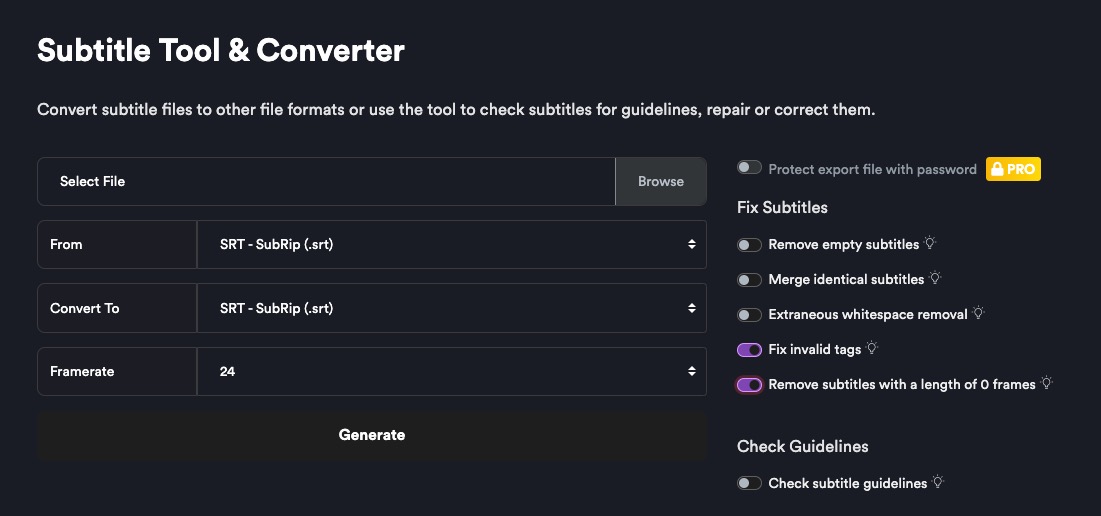
Screenshots 8A-B: This way I can speed change (adjust timings) all SRTs too for re-import.
Let’s not forget to, again, add the Broadcast Safe to the clean-feed to make it ‘legal’. We already know hot to proceed with exporting Multitrack QuickTime files. We are done and have exported several versions which usually takes a lot longer and additional people.
Conclusion
Phew... I think we all need a holiday, right?
This is just a glimpse why I love working with Final Cut Pro and do not miss much for most of my work. Of course, you need to have general knowledge of the multimedia business to get a grip. I hope this was useful to you and it might very well be that there are mistakes or I forgot to mention a crucial step. Either way, also if you want to learn more about my workflows, you can get in touch with me via my website. Looking forward to FCP 10.7 and beyond! Native audio normalization would be great at some point, this is the only place where I needed to leave FCP (besides DCP wich is kind of special purpose anyway). Ah, yes: Roles audio mixer?
If you are interested in using my special (ported from Motion) High-Pass Sharpening filter, which is better than the native unsharp mask sharpening (yuck!), you can download it. UPDATE March 20th, 2024: It appears the native sharpening effect got a lot better with one of the latest FCP updates and behaves more like a smart sharpen frequency filter now. Cool! You can actually use that now.
Appendix
As a reference, to illustrate what the Broadcast Safe filter does and what the EBU R103 norm refers to: Luma levels limitation, often also called IRE 0-100 or ‘legal range’ or ‘video levels’.
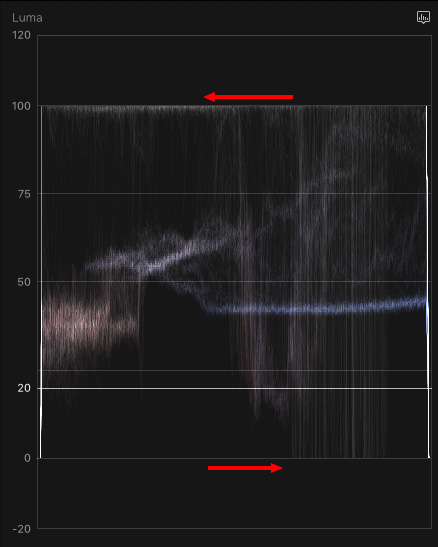
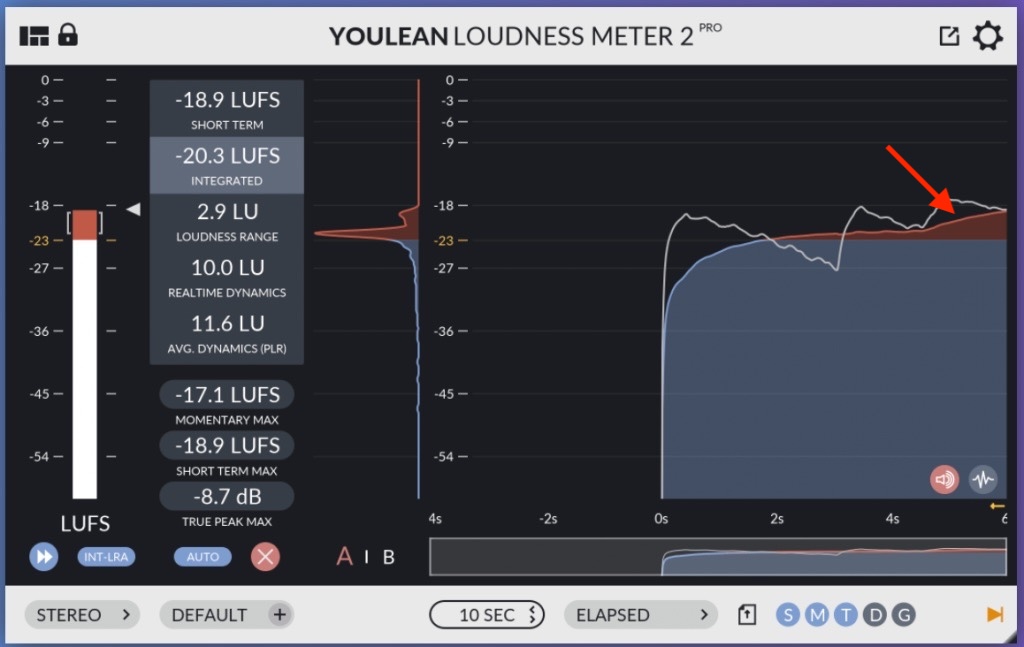
It is similar to audio normalization like the inhere often mentioned EBU R128 standard, which, in short, limits loudness (to -23 LUFS as a mean value). The difference being, it does so through lowering the mix volume, not compressing it (video levels are compressed, not cut, for roll-off).